Sunday, November 6, 2011

Fun with Dad in Denver

Sometimes people in Colorado are surprised that I am dedicated to moving home to Minnesota after finishing this dumb degree. Sure, Colorado is amazing, and I very very blessed to have the opportunity to live here for a few years. But Minnesota is home. Or more accurately, Minnesota is family. Almost my entire extended family lives in the Twin Cities area. And most importantly, my parents and siblings are there. Probably for good. We're a bunch of homebodies.

I am very lucky in that my family members come to visit Colorado pretty often. Conferences, ski time, and mountain time are all prime chances for visits. For example, my dad was in Denver this weekend for a conference, and my mom is here next weekend.


Dad and I went out in Denver for the afternoon yesterday. We visited the Denver Art Museum, which is in an awesome, castle-like building. They had a pretty cool Asian exhibit, and a Western American section, which I've never seen before. I also had my first Tattered Cover experience (awesome local bookstore). Went out at to the Corner Office and got a bowl of fried, salted peppers for an appetizer. And holy crap, my phone camera has a flash. . . This picture was after we had eaten about 1/3 of them. They were so addicting.


Dad ordered the signature chicken and waffles, and we both had a difficult time processing the maple syrup + chicken combo, but it was delicious. Even more delicious was my fresh tagliatelle with bolognese. So good in fact, that I scarfed it down before taking a picture. While walking about earlier, we saw a Johnny Rocket's, and decided after dinner that we needed a milkshake. Milkshakes!

And the best part of being a milkshake is that when you get a milkshake, you get TWO MILKSHAKES.

Sunday, October 30, 2011

Halloween the fun way


Halloween was way more awesome when we were little. You got to dress up in order to walk around outside and get candy. These days, it seems like people dress up in order to go into cramped indoor places with loud music full in order to get beer and hang out with drunk people. Total lose. Matt and I spent yesterday in our jammies making deliciously seasonal soup and playing computer games and reading Winnie-the-Pooh (ok, that was just me). Hard to think of a better way to spend a day/evening.


The deal with this recipe is you get to make your own strudel dough i.e. phyllo dough. Phyllo has always been one of those mysterious ingredients that seemed impossible to make on your own. Not so. Haha

Apple Strudel

For the filling:

  • 1 Tbsp cinnamon
  • 6 Tbsp toasted bread crumbs
  • Rind of 1 lemon
  • 1 cup sugar
  • 3/4 cup raisins
  • 8 cups finely chopped apples (~6 apples)
  1. Combine ingredients.
For the dough:
  • 1 1/2 cups flour
  • 1/4 tsp salt
  • 1 beaten egg
  • 1/3 to 1/2 cup warm water
  • 1/4 tsp vinegar
  • 2 tsp melted butter
  1. Combine ingredients and knead for 10 minutes until the dough is silky, adjusting water/flour content as needed.
  2. Brush the surface of the dough with melted butter and roll as thin as possible.
  3. Stretch the dough being careful not to tear it. If it tears easily, it probably needs more kneading. The dough should stretch an unbelievable amount, to about a square yard.
  4. Cut the edges off of the dough, as they will be think and bulgy.

For assembly:
  • 6 Tbsp melted butter
  1. brush the dough with melted butter and place filling is a log on one end. Carefully roll the strudel, making sure that the ends are covered with dough. It's ok if the dough rips, as you'll have a lot of layers. Brush the rolled strudel with more melted butter and bake for 20 minutes at 400F, then at 10 350F for 10 minutes.

Friday, October 14, 2011

adventures in chai

I have a strange relationship with tea. Namely, I'm an Asian girl who doesn't like tea. Sometimes, I'm curled up on the couch with a book when the weather is yucky, and I think. . . hey, some tea would be nice. And it never is. I do like sweet milk tea though. When in Nepal or India, I always was excited for tea when I visited someone. Since moving to Boulder, I have become a major fan of Bhakti Chai, which is a local type of chai that is sold in a lot of coffee shops around. It is wonderfully spicy and gingery. (Yes, I know the predominant flavor in chai is supposed to be cardamom, not ginger. But I don't like cardamom.) I've been a little worried about being disappointed with chai for the rest of my life. So I tried making it at home. I plan to use even more ginger next time.

Bhakti Chai Concentrate Imitation
  • 4 cups water
  • 5 black tea bags
  • 4 inches fresh ginger, sliced (~1/2 inch diameter)
  • 1 cinnamon stick
  • 1 piece star anise
  • 6 cardamom pods
  • 1/4 tsp black pepper
  • 1/2 cup crystallized ginger pieces, sliced.
  • 1/2 cup brown sugar
  1. Put tea bags, sliced ginger, cinnamon, anise, cardamom, and pepper in a medium saucepan. Add water and bring to a boil. Simmer for 5 miunutes.
  2. Meanwhile, oil your chefs knife and slice the crystallized ginger as thin as you can. Combine the crystallized ginger and sugar in a food processor and pulse until large pieces or ginger are broken up.
  3. Turn off the heat and add the ginger-sugar mixture. After 5 minutes of steeping, remove the tea bags, and let the spices steep for another 30 minutes. Strain and store in the fridge.
  4. Combine with equal parts milk and serve hot or cold.

Progress


This picture is a lot more exciting that it might look. This week was a big milestone in my PhD project, as I started my field project. I've been working on developing a new antimicrobial concrete coating and finally finished some samples to place in a manhole. Yay! It's something that's been stressing me out since May, and it feels really good to get things rolling.

We had a night on the town last night (Barnes and Noble and the Pearl Street Whole Foods). I should probably never be unattended in a bookstore, as I get way too excited about many things and disturb other patrons. Like illustrated books covering all of science. And crayons (not sure why they had crayons). And bookends.

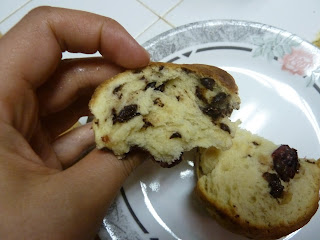
Village Baker's Holiday Cranberry-Orange Bread
from A Passion for Baking

  • 1/3 cup warm water
  • 5 tsp rapid-rise yeast
  • 4 to 5 cups flour
  • 3/4 cups warm milk
  • 3/4 cup butter, melted
  • 1 egg
  • 3 egg yolks
  • 1 tsp salt
  • 1 1/3 tsp sugar
  • 1 tsp vanilla
  • 1/2 tsp orange oil (I used zest)
  • 1 1/2 cups coarsely chopped fresh or frozen cranberries (I used dried)
  • 3/4 cups minced chocolate chips
  1. Dissolve yeast in water and let stand 2 minutes to dissolve. Add 1 cup flour and milk, butter, eggs, salt, sugar, vanilla, and orange zest. Add 3 cups of flour and knead, adding more flour as needed, for 10 minutes.
  2. Form dough into a ball, oil, and let sit covered in bowl or on counter for 30 minutes to an hour until doubled.
  3. Grease a 9-inch springform pan, and place it on a baking sheet.
  4. Gently deflate dough and press into a rectangle. Dump cranberries and chocolate on top and fold into the dough. Let the dough rest 15 minutes and then shape into 12 balls. Arrange the balls in the pan. If you like lovely browning, brush with a whisked egg. Cover with plastic wrap and proof 45-60 minutes.
  5. Prehead oven to 350F. Bake bread until browned, 40-50 minutes. Cool.


mmm delicious.

Friday, October 7, 2011

More Pumpkings!

The great pumpkin scare of 2010 and the general shortage on the east coast had some of us here in Boulder nervous about pumpkin supply. So when I saw canned pumpkin in a grocery store out of town last weekend, I went a little nuts. Turns out, cans have been appearing in local King Soopers this week. Scare averted. But we still had a large quantity of pumpking and a plethora of ideas of how to use it. So a couple of girl friends and I got together yesterday for a whirlwind pumpkin party.

Results: Pumpkin Cream Cheese Muffins, Iced Pumpkin Zucchini Bread, and Pumpkin Cookies with Maple Frosting. The only thing better than baking alone is baking with awesome friends. Friends who promote batter sampling.


In other news the chinook winds have picked up and it's crazy windy and chilly in town. Tomorrow is Ultimate Club Regionals and the forcast is not positive. It should feel like ultimate in Minnesota. I'm prepared with 5+ layers and a huge thermos ready to be filled with spiced cider.


Pumpkin Cream Cheese Muffins
adapted from Annie's Eats
Makes 24 muffins

  • 8 oz. cream cheese
  • 1 cup powdered sugar
  • 3 cups flour
  • 2 tsp cinnamon
  • 1 1/2 tsp nutmeg
  • 1 1/2 tsp cloves
  • 1/2 tsp allspice
  • 1 tsp salt
  • 1 tsp baking soda
  • 4 eggs
  • 1 1/2 cups sugar
  • 2 cups pumpkin puree (will need a big can)
  • 1 cup vegetable oil
  • 1/2 cup sugar
  • 5 Tbsp flour
  • 1 tsp cinnamon
  • 4 Tbsp cold butter
  1. For filling, blend cream cheese and powdered sugar. Roll into a log with 1 1/2 inch diameter and wrap in plastic wrap. Chill in the freezer for at least 2 hours.
  2. Grease or line with muffin liners 24 muffin wells. Heat oven to 350F
  3. Make the struesel: Combine sugar, flour, cinnamon, and butter in a small bowl and blend until combined.
  4. For the muffins, mix dry ingredients (flour, spices, salt, and soda) together. Mix the eggs, sugar, pumpkin and oil in a separate bowl. Carefully fold the dry into the wet, being careful not to overmix.
  5. Spoon about 1 Tbsp batter into each muffin well. Cut the cream cheese log into 24 equal pieces and place one in each well. Top the muffins with remaining batter. Sprinkle a little struesel on each muffin.
  6. Bake for 20-25 minutes. Cool completely before serving.

Monday, October 3, 2011

My Favorite Month


Happy October. Matt and I went up to the mountains for a mini-vacation this weekend to catch the end of the turning of the aspen leaves. We had an awesome time hiking, biking, and mostly lazing around. Watching movies in the afternoon is one of my favorite activities because it means that you don't really have to be doing anything.

We had the last pickup for our farm share last week. It's been pretty fantastic and I have already signed up for next year. We'll miss our amazing tomatoes and potatoes. That is, after we work our way through our backlog (4 weeks of beautiful, small, colorful potatoes).
I made two loaves of brioche to leave at the mountain house for french toast throughout the ski season (Middle-class french toast = 1 stick butter per loaf). We made a preliminary round of Alton Brown's french toast (mmm half-and-half), which was very tasty, even for the girl who doesn't like french toast. We also made a batch of the baked brownie to freeze and bring to the ski hill. I'm looking forward to many 2pm brownie breaks on the lift. I separated them into edge and middle brownies, because then I can feed the edges to the crazies who like them. Here's how I dig into a pan of brownies:


Tuesday, September 27, 2011

Apples!

A room-sized work at MOMA

I went to New York this summer, and in my non-bloggingness, forgot to talk about it. I was visiting a good friend from high school/college/travelling abroad and it was my first time in the city (well, since I was 10). I spent a lot of time wandering about the midtown area. MOMA was amazing, as was the natural history museum. We got rush tickets to Memphis (which won best musical last year), which was excellent, especially at BOGO student prices. I love musicals.

Food highlights included Caracas arepa bar, a gyro from "the best" Halal cart, a bagel from H&H with salmon spread, a chocolate chip cookie from Levain (yum!), red bean ice cream from a cute place in Chinatown, and a Kosher Indian dinner that we cooked. Cooking kosher is hard. But kind of fun. For one night.

This guy is a pro dog-walker. Really.

I've been eyeing this apple "cake" recipe for several months. It's really a pie baked in a cake pan. But kind of a tart because it's open on top. I love that it takes 10 apples. I brought it to a pasta dinner for my frisbee team and it was rapidly consumed. On that note, I played frisbee at practice this week for the first time in 3 months. Wooooooo! My physical therapist says that my hamstring is almost totally normal again. Too bad I missed the end of this season, but I'm going to be raring and ready for next year.


Rougemont Apple Pastry Cake
adapted from A Passion for Baking
  • 2 cups flour
  • 1 Tbsp sugar
  • 1/2 tsp salt
  • 3/4 cup cold butter, in chunks
  • 5 Tbsp ice water
  • 10 large apples, cored and slices
  • 1/4 cup sugar
  • 1 Tbsp cornstarch
  • 1 tsp ground cinnamon
  • 1 Tbsp lemon juice
  • 1/2 cup melted butter
  • 1 cup sugar
  • 2 tsp vanilla
  • 4 eggs
  • 2 Tbsp flour
  • 1 tsp ground cinnamon
  1. For the pastry crust, mix flour, sugar, and salt. Cut in butter until grainy. Add ice water and mix gently until just combined. The dough should be dry and shaggy, but should hold together when squished. Place into a bag and refrigerate for at least an hour.
  2. Preheat oven to 350F. Brush a springform pan with melted butter and place on a baking sheet. Roll the dough into a circle and fit into the bottom and sides of the 10-inch springform.
  3. Toss apples with sugar, cornstarch, cinnamon, and lemon juice. Fill the crust with the apples (you can make them pretty if you like). Cover pan with aluminum foil and bake 60-75 minutes until apples are soft.
  4. For vanilla sauce, mix melted butter, sugar, vanilla, eggs, flour and cinnamon. Pour over the hot cake. Make sure you get the sauce into all the nooks and crannies. Bake another 20 minutes. Cool on a wire rack. Refrigerate 6 hours or overnight before serving.

Sunday, September 18, 2011

Happy (late) Mid-Autumn Festival


Moon cakes are the traditional treat passed around during the Chinese Mid-Autumn Festival. They are also one of my favorite pastries. Matt got me a moon cake mold a couple of years ago, and I've made several batches. This recipe is the best yet. I like red bean paste filling, but I'm particularly fond of sweet red bean stuff. You can use other sweet fillings too. When I was in Beijing, my European friends took a couple of months to realize that the brownish stuff oozing out of the pastries in the window was bean paste and not chocolate. This was a serious disappointment for them, but not for me.


Forming the cake without mangling it is tricky.


Moon Cakes
  • 2/3 cup corn syrup or simple syrup
  • 1/8 tsp baking soda
  • 2 3/4 cups flour
  • 1/2 cup oil
  • 1/2 can black or red sweet bean paste
  • 1 egg
  1. Mix the first 4 ingredients together to form a soft dough. Divide into 12 pieces and roll into balls. Flatten each ball into a circle using plenty of flour to keep it from sticking.
  2. Place a tablespoon of into each dough circle and gently place into the moon cake mold. Close the dough over the filling and whack the mold to get the cake out.
  3. Bake cakes for 15 minutes at 350F.
  4. Brush with an egg wash made from one beaten egg with 1 Tbsp water and bake another 15 minutes until golden.

Thursday, September 15, 2011

Pumpkin love and fish paste

They opened up an IKEA in Colorado, and I went with a friend last weekend. I've always been a little fixated with IKEA. It's like walking around in someone else's well-designed and fabulously clean house. And they have $1 ice cream. This time, I also discovered they have salmon paste. Which is delicious. And in a tube.


One of my favorite parts of fall is the prerogative to bake delicious apple and pumpkin items. Matt likes pumpkin more than anyone I've ever met. Pumpkin pie, pumpkin lattes, pumpkin bread. When we set out to find a pumpkin bread recipe this week, we browsed through recipes and he pointed out which breads were acceptable by their picture. Is the top a bit shiny? Does it look moist inside? This one fit the bill for all. And I got to change the name. I'm so funny.


I brought some so school today, only to find that my friend SB had also brought pumpkin bread. After bantering about how delicious pumpkin bread is an whose would be yummier, we discovered that we had both made the same recipe from online. Creepy.


Pumpking Beard
adapted from Allrecipes

  • 1 (15 ounce) can pumpkin puree
  • 4 eggs
  • 1 cup vegetable oil
  • 2/3 cups water
  • 2 1/3 cups white sugar
  • 3 1/2 cups flour
  • 2 tsp baking soda
  • 1 1/2 tsp salt
  • 1 tsp ground cinnamon
  • 1 tsp ground nutmeg
  • 1/2 tsp ground cloves
  • 1/4 tsp ground ginger
  1. Preheat oven to 350F. Grease and flour 2 9x4 inch loaf pans (or 3 7x3 inchers).
  2. Mic pumpkin with eggs oil, water, and sugar until well blended. Mix dry ingredients in separate bowl. Gently fold dry ingredients into wet (no whisking!) Pour into pans.
  3. Bake for 50 minutes, turning halfway through, until toothpick comes out clean. Cool a couple of minutes before removing from pan.

Friday, September 9, 2011

Yoga? Me?


We've been making out like bandits on our farm share this summer. Every week, we drop by the farms booth at the farmer's market and get a huge amount of local produce (as above). We've been eating a lot of bruschetta and cucumber salads (though we don't have a good use for bell peppers, as neither of us are really excited about them). I am especially partial to the adorable fingerling potatoes we get in three colors. It's actually rare for the strawberries to make it home from the market, so you can tell we were restrained this week. We have been trying to use our produce in different ways, like this onion/tomato focaccia:


I bought a groupon for a local yoga studio this summer, and just started going this week. Previously, I've always dismissed yoga as being too touchy-feely. Then again, I didn't think much of stretching or cooling down after a workout either. Here in Boulder it seems like half the people you meet are yoga enthusiasts. Yes, this town is full of hippies. But it's also full of phenomenal athletes, many of whom do yoga to keep up their core strength and flexibility. I did my first session of hot (100F) yoga this afternoon, and despite feeling a little ill at times, I got some unbelievably good stretches. Though I probably won't dish out the $160 a month for a membership to this studio, I hope to make the most of my month of yoga and to incorporate some poses into what has become my regular stretching routine.

Fall has set in for real here. The students are back, the temperatures have dropped, and soon enough we'll be getting those crazy chinook winds out of the mountains. Even though I'm not taking classes this semester, my schedule is a lot more structured than in the summer. I started tutoring at the engineering student center, and I really enjoy going through problems with students. Maybe I miss have a concrete answer to a problem and then being able to move on the the next problem. Or maybe I just miss math and physics. They seemed so magical when I studied them in college.

Matt and I have been watching old episodes of Good Eats. If you've never seen it, you should. It's cooking for nerdy people who wonder why things happen the way they do in the kitchen. In an episode about cinnamon buns, he makes this ginger ring bread that I couldn't resist trying on my own.

Citrus-Ginger Ring
from Good Eats

For the dough:
  • 4 large egg yolks
  • 1 large egg
  • 1/4 cup sugar
  • 6Tbsp melted butter
  • 6 ounces (3/4 cup) buttermilk or yogurt
  • approx. 4 cups flour
  • 2 1/4 tsp instant yeast
For filling:
  • 1 cup sugar
  • 1 cup flour
  • zest from 2 medium lemons
  • 2 Tbsp candied ginger , finely chopper
  • 2 Tbsp fresh ginger, grated
  • 2 Tbsp melted butter
For the glaze:
  • 4 ounces apricot or other jam
  • 2 Tbsp candied ginger, finely chopped
  • 2 Tbsp water
  1. For the dough, combine yolks and egg (should be at room temperature) and sugar, butter and buttermilk. Whisk in 2 cups of the flour, yeast and salt until combined. Add 1 1/2 cups more flour and knead for 10 minutes by hand or 5 minutes on high and 5 minutes on low in a mixture. Add more flour if the dough is sticky. It should be soft, but not sticky. If mixed in a mixer, knead by hand for 30 seconds. Oil a large bowl, place dough in it and let rise until double (2-2.5 hours)
  2. For the filling, mix sugar, flour, gingers, and zest until combined, and set aside
  3. When the dough is risen, roll into a 12x24 inch rectangle. Brush the 2 Tbsp melted butter on the dough and sprinkle the filling evenly over the dough, leaving one inch along one of the long edges. Press it in lightly. Roll the dough and seal using the inch you left free of filling. Pinch it together real good. Place on greased baking sheet, cover with plastic wrap, and refrigerate overnight.
  4. Place the ring in an unheated oven with a pan of boiling water and let it proof there for 30 minutes. Remove from over
  5. Preheat oven to 350F. When ready, put ring in middle rack and bake 30 minutes.
  6. While ring bakes, combine jam, ginger, and water in microwave-safe bowl. Microwave for 5 1-minute intervals on high, stirring each time. Brush over the warm ring when it comes out of the oven.
  7. Serve as soon as possible.

Saturday, August 13, 2011

Dog Days

Every summer since I was in elementary school, I've always made a huge list of things to do, books to read, people to visit. And I never accomplish most of the things I aim to do. So it continues with this summer. I've been travelling a fair bit, to conference, visiting home, visiting old friends. Thus I have gotten very little done at work, and feel like I am never at home.

I had a hamstring injury in April, and didn't realize how serious it was until June, when I ceased to be capable of playing ultimate. I've been trying to rehab it, but have recently realized that if I ever want to be able to run fast again, I should probably rest it over the winter. So no frisbee for me this season, despite joining an awesome team full of awesome people that I would love to play with. Booo.

Three of our best friends are leaving town for good and starting new jobs elsewhere. They were the first friends we made here, and it's hard to imagine Boulder without them.

You probably shouldn't read this recipe if the thought of beans in baked goods grosses you out.


Black Bean Brownies
  • 1 15-oz can black beans (1 1/2 cups)
  • 3 eggs
  • 3 T oil (I used applesauce)
  • 1/4 c cocoa
  • 1/8 tsp salt
  • 1 tsp vanilla
  • 3/4 cups sugar
  • 1/2 cups chocolate chips
  1. Preheat oven to 350F. Line and grease a 8x8 square pan
  2. Blend the beans to bits in a food processor. Add remaining ingredients and whiz together.
  3. Pour into pan and bake 30 minutes.

Thursday, June 9, 2011

My first savage tournament: The Bob Loblaw Law Blog


I got back to 5,600 ft. and immediately played in a savage tournament. 10 people per roster, 7 play per game and no subbing. My kind of game. I played with a group of wildly talented Minnesotans who made the trek to Colorado for the weekend. The fickle weather gods around here rewarded them with perfect weather. Ultimate is my happy place.

Since I got home, I've been catching up on work and food magazines and baking up a storm to release stress about my field study this summer. Despite my chagrin that this month's Bon Appetit had a person's face instead of a beautiful food item, I made it's salsa verde in anticipation of summer grills. I also could put my lovely glass jar collection to use, and give the man less excuses to harass me about how many glass jars I've accumulated. I made pickled red onions recently too. See Jen's blog for a good recipe.


Salsa Verde
from Bon Appetit June 2011

  • 6 oil-packed anchovies, chopped
  • 1 garlic clove, chopped
  • 1 1/2 Tbsp capers, rinsed and chopped
  • 1 jalepeno, stemmed, seeded, and minced
  • 4 cups loosely packed fresh parsley leaves, chopped
  • 2 cups loosely packed mint leaves, chopped
  • 1 cup loosely packed cilantro leaves, chopped
  • 1 cup extra-virgin olive oil
  • kosher salt to taste
  1. Grind anchovies, garlic, capers, and chile in food processor until chunky.
  2. Add herbs and stir to combine (I whizzed it here too, but only because I don't like parsley chunks)
  3. Use a fork to slowly whisk in the oil.
  4. Season to taste with salt.
  5. Let stand for 30 minutes at room temp before using.
  6. Store in the fridge for up to one week
As a microbiologist, I have somehow adopted the resolution that microbes don't make you sick, so I will probably be eating this for a month. I'll let you know if this action results in severe discomfort.

Wednesday, May 11, 2011

Ultimate and balls


Ultimate season is here. I played ultimate several days a week all through college, and only sparingly since. I definitely hadn't gone to a practice since 2008. On moving to Colorado for grad school, I thought maybe my ultimate days were over. I know so many people who have been seriously hurt playing. And there are so many other things to do here, right? I didn't miss it until I started playing again. Now I don't think I can stop.

Playing ultimate is one of the only situations in life where I feel like I can be my crazy self with people I hardly know. I'm usually super shy until I know someone for a month or so. Maybe its because I learned the sport with my best friends. Maybe it's just because I'm good at it. Either way, I am happier during ultimate season. And I like myself more. Which rocks.


In other news, I defend my PhD thesis proposal in front of my committee today. Wish me luck! I can hardly believe I'm actually doing this crazy thing.

When I was a small child, I used to eat cake in a most appalling way. I would mush the frosting and cake together into a sweet goopy paste. I did the same thing with a lot of food. Everything is homogenous and even. And it's not gross, because it gets like that in our tummy anyway. Or something. I think I've always been a little obsessed with ratios in my food. Even now, I can't eat lucky charms because I have to worry about having the exact same ratio of marshmallows to cereal bits in each spoon.

Potting soil? Biosolids? Or cake bits?

Anyway, this recipe enables me to connect with my inner cake-mushing self. I used a store-bought chocolate cake mix, because I was feeling lazy and made dulce de leche for the frosting. On that note, I love dulce de leche. It's like magic. Condensed milk into pot; 2 hours later, dulce de leche out. For dipping, I used a package of that funny white candy coating stuff. I didn't look at the ingredients for fear of being creeped out. Sprinkles help too.

Cake Balls
adapted from seemingly everywhere these days

  • one 13x9 baked cake, any flavor (from a box or otherwise)
  • one batch cake frosting (homemade or store-bought)
  • one package candy coating (or tempered chocolate if you're good at that. I'm not)
  1. Bake the cake however you like and let it cool completely.
  2. Mush the cake in a bowl a little bit at a time. Add the frosting and mix.
  3. Form the cake goo into little balls of your favorite size and place on a cookies sheet. Stick them in the freezer for a couple of hours.
  4. Melt the coating or chocolate over a double boiler. Take your frozen cake balls out and dip them.
  5. These keep best in the fridge.

Saturday, April 23, 2011

Madness


I am so excited to spend this summer in Boulder. Last summer was awesome (Cape Cod Micro Boot Camp), but Boulder is such a beautiful place, it seemed a shame to be away. I haven't been out on my bike yet, but I'm playing ultimate again. It's like crack. I know it's not good for my body and I can't play it forever, but it makes me so darned happy. I can't stop. I'm hoping to play with a club team this year and make it to a bunch of tournaments. And practice. I miss practice. Sometimes when the Colorado women are practicing behind my building, I sit and stare. I might look creepy, but I don't really care.

This month has been and will continue to be insane. Thesis proposal defense, getting concrete samples made and into my field site for the summer, conference poster in May, trying to get two different types of sequence data. Etc.

On another note, we saw the Atlas Shrugged movie last night. It was entertaining, though the acting and casting was a little off. It was rough to see my favorite character in all fiction portrayed as shaggy and chubby. But a lot of scenes were pretty good. And the sleazeballs sure were sleazeballs.

Matt likes to make mochas in the morning to take to work, and usually used Hershey's dark chocolate syrup. We happened to run out, and I happened to run across a recipe. I get serious pleasure from making simple things at home that other people just buy. Bread. Jam. Pasta Sauce. And now chocolate syrup.


Chocolate syrup
  • 1 cup sugar
  • 3/4 cup water
  • 1/2 cup cocoa powder
  • 1 tsp vanilla
  1. Mix sugar, water and cocoa in a small pan. Bring to a simmer over medium heat and cook for 30 minutes.
  2. Remove from heat and add vanilla.
You can cook it longer or shorter to get the consistency you want. I also added a handful of chocolate chips to make it extra delicious. I put it in a cute squeeze bottle I'd saved.

Wednesday, February 23, 2011

The bacon bandwagon


I've been thinking a lot lately about all the wonderful things that have just landed in my lap over my lifetime. It's hard to be angry or frustrated when I realize just how good I've had it. I had an older brother to look up to, and he even let me hang out with his friends. I ran into the love of my life at age 16 and am still madly in love. An amazing family has conditioned me to succeed. I've had the opportunity to live abroad in 3 amazing locales. Everything, from school to music to career, seems to have been laid out for me to be the luckiest girl in the world. It's sobering, and I don't deserve most of it. I know Thanksgiving is long past, but thanks. Everyone.


I spent last weekend on an oil-soaked beach in Louisiana sampling for a bioaerosols project. We people so some stupid shit to this world. The oil impacts are still so scary. If you dig 3 inches into the sand, it turns brown and then black. And the liquid seeping through does not look like water. There were clean-up crews on the beach manually cleaning the sand by dragging rakefuls out to the surf and rinsing them in the seawater. Where the heck do they think that oil is going to go?

It seems that recently bacon + sweet things has been a growing trend. Bacon with nutella, bacon cookies, chocolate-dipped bacon, candied bacon. As general bacon enthusiasts, we had to try this recipe. They are addicting. Brushing them with bacon grease was definitely a brilliant idea.


Bacon and Date Scones
from Bon Appetit
  • 10 ounces thick-cut bacon slices
  • 2 cups flour
  • 1/2 cup sugar
  • 1 1/2 tsp baking powder
  • 3/4 tsp baking soda
  • 1/2 tsp coarse kosher salt
  • 3/4 cup coarsly chopped Medjool dates
  • 1/2 cup chilled butter
  • 2/3 cup buttermilk or yogurt
  1. Preheat oven to 400F. Line baking sheet with parchment paper. Cook bacon in heavy skillet over medium until cooked but not crisp. Transfer bacon to paper towels to cool and reserve grease. Chop bacon when cooled.
  2. Mix flour, sugar, baking powder, baking soda, and salt in large bowl. Stir in chopped bacon and dates. Grate butter into mixture using a cheese grater and stir in. Stir in buttermilk. Mix, then knead briefly.
  3. Transfer dough to floured surface and form 8-inch round. Cut into 8 wedges and transfer to baking sheet. Cover and shill for 2 hours or overnight. Brush with reserved bacon drippings and sprinkle with sugar.
  4. Bake scones until golden brown, 16-18 minutes. Serve warm or at room temp. If storing, cool completely and store in an airtight container.